Tuesday, December 29, 2020

Cocoa & Crafts 2 Last Project

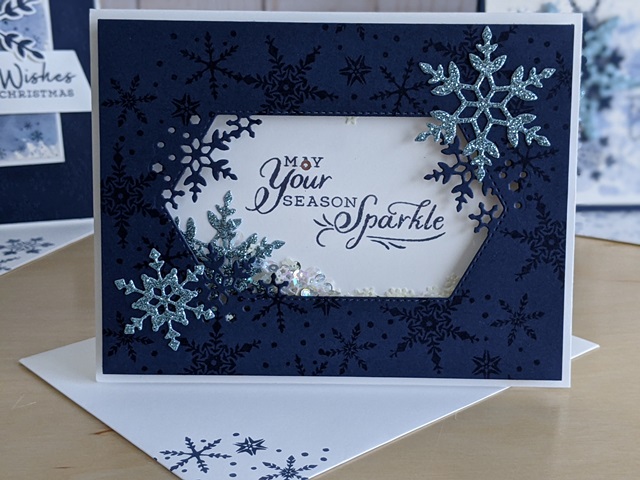
 Oh my, my, my. I'm so late with this post! I had originally planned on posting this last Tuesday, and completely forgot!! I think I need to learn how to schedule these ahead of time for crazy, busy weeks. 

Thankfully this project isn't a Christmas project, but a wintery friendship one. It's a beautiful card made with the same "smooshing" technique we used on the last project. Hope you enjoy!


Till next time...
God's love and blessings!

Saturday, December 19, 2020

Cocoa & Crafts 2 Project 3


Can you believe it's almost Christmas! Just a little over a week to go. Today's project is a great one to use as a last minute gift or stocking stuffer. It looks like a card, but it actually holds a hot cocoa packet. So fun!


Here's the measurements for today's project:
White base: 8 1/2 x 5 1/2
Navy panel: 4 1/8 x 5 3/8
White panel: 3 x 4
Whisper White panel: 2 7/8 x 3 7/8
Sentiment strip: 4 x 1 

Next week I will be back with the last project for this month's class. See you then!

And here's the supplies you would need if you don't have a kit:


Till next time...
God's love and blessings!

Monday, December 7, 2020

Cocoa & Crafts 2 Project 2


Hello there! How are you doing today? I pray all is well. Today we're going to work on our second project for this month's Cocoa & Crafts class, and it's a fun shaker card. If you've never made one, it's super easy. Much easier than they look. 


For this project you will need your kit (of course), and some adhesive. That's it! Let's get crafting!

Here's the measurements for this project:
Card base: 8 1/2 x 5 1/2
Night of Navy front panel: 4 x 5 1/4
Window sheet: 3 3/4 x 5 

And here's what you would need if you don't have the kit:


Till next time...
God's love and blessings!

Monday, November 30, 2020

Cocoa & Crafts 2 Project #1


Well, here we are at the beginning of December and the beginning of a new Cocoa & Crafts class. I hope you enjoy the projects I have planned for this class. We're starting off with a special request for this shadow box. In this class you will need your Cocoa & Crafts kit, a pair of scissors and adhesive. You might also want some liquid glue of your choice. I've included glue dots, but I find the glue holds the ribbon on better. Let's get crafting!


Here's the measurements for the project:
Card base piece #1: 8 x 5 1/2 scored at 4 1/4
Card base #2: 8 1/2 x 5 1/2 scored at 1/2, 4 1/4 and 4 3/4
Navy blue insert: 3 1/2 x 5 1/2
Navy blue piece for front: 4 1/4 x 3
Stamped panel for front: 3 1/4 x 4 1/2

And here's a list of the supplies used:


I'm looking forward to next week's shaker card project! See you then!

Till next time...
God's love and blessings!

Sunday, November 29, 2020

December Suite Sampler Samples.


Hello there! I pray you are enjoying the season wherever you may be right now. We just celebrated Thanksgiving this week, and while 2020 has been a bit challenging, we have so, so many things to be thankful for. For one, I am thankful for you and all those who not only craft, but use that talent to bless others. 

In a recent newsletter to my customers, I showed them the cards above. I set myself a challenge to use just two sheets of DSP, along with cardstock and ribbon from this month's Suite Sampler. I did use the matching stamp set, but only for the sentiments, which could easily be swapped out for sentiments in stamp sets you may already own. 

I started by cutting poinsettias from one of the 6x12 sheets of DSP to use as the focal points on most of the cards instead of stamping. Each kit has two of these sheets, so you could make twice as many cards as I did. 

I then took a second piece of 6x12 DSP and cut it up as you see below. I don't have exact measurements for you, but I started by cutting off a 3/4 x 12 strip from a long side and then dividing the remaining piece into three 5 1/4x4 pieces. I then cut those pieces up to make the individual pieces you see. Remember, this is double sided DSP, so while it looks like wood in this picture, the other side has the red berries, so I was able to get a variety of looks with just this one sheet. 


What do you think? I'm excited to have a few of my Christmas cards ready to go along with a thank you and blank card, and I still have lots left over from my kit to make more projects. I also liked the non-traditional colors on some of the cards. 

If you are interested in this kit, check out the page listed above labeled "Suite Sampler". The deadline to order is Tuesday, December 1st, so there isn't much time (sorry, I meant to post this before Thanksgiving, but cooking happened instead. 😋)

Till next time...

God's love and blessings!

Monday, November 23, 2020

Cocoa & Crafts 1 Project 4


I am sad to say this is the last project for this Cocoa & Crafts class. I do hope you enjoyed each of the projects and are looking forward to our next class. While that class is already full, I will be posting info for the class for January pretty soon.

As you can see, this project focuses on chocolate, but you could easily use this same layout with any of the other goodies in the Nothing's Better Than stamp and die bundle and make it all about coffee or cookies, or, as I mention in the video, even tea. You can even change up the chocolate to either milk or dark, whichever is your preference. It's really a very versatile layout. 


Here are the measurements. 

Card base (Early Espresso): 8 1/2 x 5 1/2 scored at 4 1/4
Front and inside (Very Vanilla): 4 1/8 x 5 3/8 (2)
Early Espresso frame: 3 1/8 x 4 3/8
Very Vanilla front piece: 3 x 4 1/4


Here's a list of supplies used. If you're interested, you can simply click on an image below and it will take you to my store. Remember, if you do purchase, use the Hostess Code you see in the upper right of this page so I can send you an extra goodie in your thank you package. 


I hope you have enjoyed this first Cocoa & Crafts class. I am planning on the next class starting next Tuesday (December 1st). I hope to see you there!

Till next time...
God's love and blessings!

Monday, November 16, 2020

Cocoa and Crafts 1 Project 3

Woohoo! We've made it to the third project in our first Cocoa and Crafts class. I hope you are enjoying the projects and my videos have been easy to craft along with, even with all my boo boos. I mention it in the video, but for those with the kit be aware that there are TINY little pieces in one of your envelopes, so be careful when you unpack everything. Also, please note that I make a mistake (actually several of them) in the video, but at one point I list the scoring measurements and I state that a score line is 2 5/8 when it is actually 2 3/4. Oops. 


Here are the measurements:

Card base: 11 x 4 1/4 scored at 2 3/4 (NOT 2 5/8) and 5 1/2

Z fold strip: 11 x 1 scored at 2 3/4 and 5 1/2

"Cookie" pattern paper: 2 5/8 x 4 (2 of them)

Inside liner: 2 5/8 x 4

Vellum circle: 2 inches

"You are like" word strip: 2 x 3/8

And here's a listing of all the supplies used in this project, and don't forget, if you place an order under $150 use the Hostess Code you see in the upper right corner of this page so I can send you some extra goodies with your thank you gift. 


Next week will be our last project for this class. Looking forward to it and hearing from you and what you've enjoyed. 

Till next time...
God's love and blessings!