Monday, December 5, 2022

Cocoa & Crafts Fond of Autumn #4


 Hello there! I am so sorry for being late with this, even later than expected. My computer updated to the newest operating system, and my video editor wouldn't work properly with it. Took me a while to get things figured out. Sorry about that. 

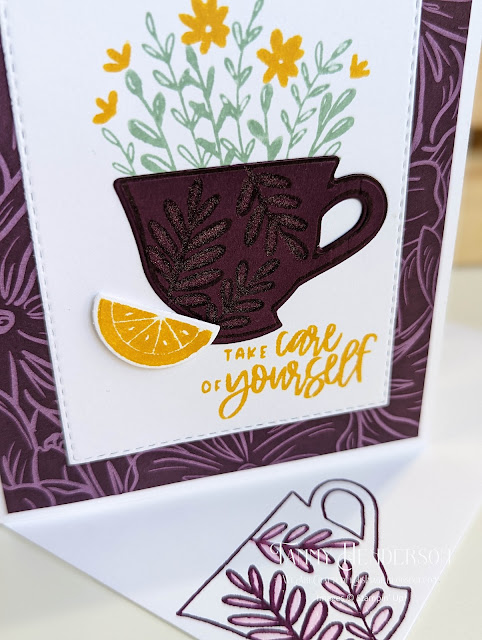
I hope you like the final project for this class. We will use the extra pieces from our previous projects to make a pretty floral thank you card. Of course, you could totally change up the sentiment and make this card for just about any occasion. I do like the color combination of So Saffron, Soft Succulent and Soft Suede. Very cheerful, yet elegant.


Here are the measurements: 

  • Card base-- 11 x 4 1/4 scored at 5 1/2
  • Front panel-- 5 1/2 x 4 1/4 with about a half an inch torn off the side
  • Inside panel-- 5 1/4 x 4


I hope you have enjoyed today's post. If you decide to place an order through my website, if your order is less than $150, please use the Host Code listed above (on the right), so I can send you an extra free goody. If your order is over $150 don't use the code as you get to pick out the goody yourself when you place your order. 

Till next time...
God's love and blessings!

Wednesday, November 30, 2022

Cocoa & Crafts Fond of Autumn #3


Hello there! I'm back with the third project in our Fond of Autumn Cocoa & Crafts Class. I'm sorry for being late with this post. I hope to get the last project posted tomorrow.

This card has a fun fold to it that allows you to put a battery operated tea light in it to make the pretty die cut image glow. 


Here are the measurements:

  • Card base: 4 1/4 x 11 scored at 5 1/2
  • Inside panel: 4 1/8 x 10 3/4 scored at 3, 5 7/8, 7 3/4
  • Vellum: 3 3/4 x 4 1/2
  • Front Panel: 4 1/8 x 5 3/8


I hope you have enjoyed today's post. If you decide to place an order through my website, if your order is less than $150, please use the Host Code listed above (on the right), so I can send you an extra free goody. If your order is over $150 don't use the code as you get to pick out the goody yourself when you place your order. 

Till next time...
God's love and blessings!

Monday, November 14, 2022

Cocoa & Crafts Fond of Autumn #2


Hello there! How are you this fine fall day? It actually looks like winter outside my window right now as we are having our first significant snow fall of the season. It's so pretty!! Yes, I'm one of the strange people who really enjoys winter here. I'm sipping some hot tea while I craft away today. 

Despite the snow outside, it is still fall, and not too late to send someone this pretty card. I forgot to mention in the video to hold on to the extra pieces once you cut out the large image we stamped. We're going to use the flowers and berries in our last project for this kit, so store them away with the fourth envelope. 

Here are the measurements along with the items I used: 

  • Card base-- 5 1/2 x 8 1/2 scored at 4 1/4
  • Front panel-- 5 3/8 x 4 1/8
  • Inside panel-- 5 1/8 x 3 7/8
  • Word strip--3/4 x 3 1/2 trimmed to fit


I hope you have enjoyed today's post. If you decide to place an order through my website, if your order is less than $150, please use the Host Code listed above (on the right), so I can send you an extra free goody. If your order is over $150 don't use the code as you get to pick out the goody yourself when you place your order. 

Till next time...
God's love and blessings!

Tuesday, November 8, 2022

Cocoa & Crafts Fond of Autumn #1


Hello there! Today we are starting a new Cocoa & Crafts class featuring the Fond of Autumn stamp set. This is a very pretty and versatile set. 

Here are the measurements: 

  • Card base- 4 1/4 x 11, scored at 5 1/2
  • Front panel- 3 1/4 x 4 1/2
  • Inside panel- 4 x 5 1/4
And, as promised, here is the list of Blends I used:
  • Large leaves- 200, 400 and Ivory
  • Small leaves- Light and Dark Old Olive
  • Berries- Light and Dark Petal Pink
  • Acorn caps- Light and Dark Suede
  • Acorn bottoms- 500 and Ivory


I hope you have enjoyed today's post. If you decide to place an order through my website, if your order is less than $150, please use the Host Code listed above (on the right), so I can send you an extra free goody. If your order is over $150 don't use the code as you get to pick out the goody yourself when you place your order. 

Till next time...
God's love and blessings!

Tuesday, November 1, 2022

Cocoa & Crafts Cup of Tea #4


Hello there! Here is the last project for our Cup of Tea Cocoa & Crafts class. This is a fun way to show off both sides of our Designer Series Paper. 


I hope you like this one. 


Here are the measurements:

  • Card Base: 5 1/2 x 8 1/2 scored at 4 1/4
  • Front panel: 5 1/4 x 4 
  • Inside white panel: 5 1/4 x 4 
  • Designer Series Paper panel: 5 1/4 x 4 scored at 1/4


I hope you have enjoyed today's post. If you decide to place an order through my website, if your order is less than $150, please use the Host Code listed above (on the right), so I can send you an extra free goody. If your order is over $150 don't use the code as you get to pick out the goody yourself when you place your order. 

Till next time...
God's love and blessings!

Wednesday, October 19, 2022

Cocoa & Crafts Cup of Tea #3


Hello there again! I'm a little late, but here's this week's project. This is a simple little get-well kit that holds a Cup of Soup and a tea bag. I did have to order the Cup of Soup from Amazon as all of our local stores only carry the large family size soup envelopes, not the individual cup size. The same template could be used to hold a hot cocoa packet and a small chocolate. 

Here are the measurements:

  • Card base- 8 1/2 x 11 (see video for cutting instructions)
  • Inside panel- 4 x 5 1/4
  • Front pocket- 4 3/8 x 3 (see video for adhering instructions)


I hope you have enjoyed today's post. If you decide to place an order through my website, if your order is less than $150, please use the Host Code listed above (on the right), so I can send you an extra free goody. If your order is over $150 don't use the code as you get to pick out the goody yourself when you place your order. 

Till next time...
God's love and blessings!

Cocoa & Crafts Cup of Tea #2


Hello there! I have, apparently missed a week. I'm not sure what exactly happened, but I'm two classes behind! So very sorry. I will post yesterday's class later today so you can get all caught up on your projects. 

Anyway, on to what should have been last week's project, this cute card. Super simple and easy, but what a sweet card to send to someone who's feeling a little under the weather. 


The measurements are super simple:

  • Card base- 8 1/2 x 5 1/2 scored at 4 1/4
  • DSP mat- 4 x 5 1/4 


Here's a list of supplies I used:


I hope you have enjoyed today's post. If you decide to place an order through my website, if your order is less than $150, please use the Host Code listed above (on the right), so I can send you an extra free goody. If your order is over $150 don't use the code as you get to pick out the goody yourself when you place your order. 

Till next time...
God's love and blessings!

Sunday, October 9, 2022

Cocoa & Crafts Cup of Tea #1


Hello there my crafty friends! I'm back with another Cocoa & Crafts class. This month we are using the sweet Cup of Tea stamp set and a trio of pretty colors: Blackberry Bliss, Daffodil Delight and Mint Macaron. 

Today's project is an angled easel card using not only the Cup of Tea stamp set, but pretty papers from the Design a Daydream Designer Series Paper. This is a HUGE pack of paper! 


Measurements for this card:

  • Card base: 4 1/4 x 9 3/4 scored at 4 1/4 and then scored diagonally (see video)
  • Petal Pink base: 4 1/4 x 5 1/2
  • DSP layer: 4 x 5 1/4
  • DSP strip: 1 1/2 x 5 1/4


I hope you have enjoyed today's post. If you decide to place an order through my website, if your order is less than $150, please use the Host Code listed above (on the right), so I can send you an extra free goody. If your order is over $150 don't use the code as you get to pick out the goody yourself when you place your order. 

Till next time...
God's love and blessings!

Tuesday, August 30, 2022

Cocoa & Crafts Wisteria Wishes 4


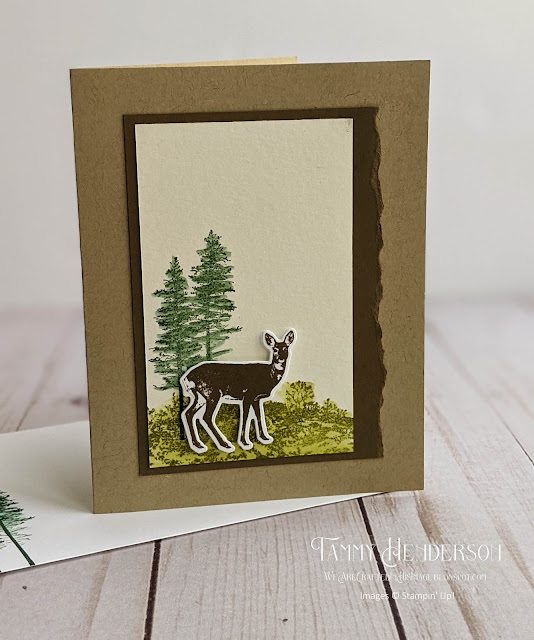
Hello there! Welcome back to my little crafty space. This is the last of this month's Cocoa & Crafts projects. Once again we are changing the flowers in this set. So far we've made wisteria, lilacs, and even Christmas trees. Today we will be making a field of blue bonnet style flowers. We are using some watercolor paper to get the pretty blurred effect in the background. 


The measurements are pretty simple:

  • Card base 8 1/2 x 5 1/2 scored at 4 1/4
  • Watercolor panel and inside panel: 4 x 5 1/4
  • Frame 4 1/4 by 5 1/2 cut with second largest rectangle in Stitched Rectangles Dies.

I hope you enjoyed the projects we've made with this stamp set this month. It was definitely a fun set to work with. I'm looking forward to the next class as it will be using the Cup of Tea stamp set. I've probably mentioned in a few of my videos that I collect tea cups, so this is a favorite set of mine. Hope to craft with you then!


I hope you have enjoyed today's post. If you decide to place an order through my website, if your order is less than $150, please use the Host Code listed above (on the right), so I can send you an extra free goody. If your order is over $150 don't use the code as you get to pick out the goody yourself when you place your order. 

Till next time...
God's love and blessings!

Wednesday, August 24, 2022

Cocoa & Crafts Wisteria Wishes 3


Hello there! I think this is one of my favorite projects in a while. I am still amazed at how versatile this stamp set is. Yes, It's supposed to be wisteria flowers, but turn them upside down and you get pine trees that are perfect for a cute Christmas treat box. 


As promised in the video, here are the measurements so you can recreate this box anytime you'd like: 

  • Base: 8 1/2 x 5 1/2
    • Score along the short side at 1 1/4, 4 1/4
    • Score along the long side at 3 3/4, 4 3/4
  • Front panel: 3 1/2 x 2 3/4
I hope you like this little treat box/bag. I think this would be a fun party favor or a simple treat to give a friend for no other reason than being your friend. So, I challenge you to make up a few of these and give them out this next week. 


I hope you have enjoyed today's post. If you decide to place an order through my website, if your order is less than $150, please use the Host Code listed above (on the right), so I can send you an extra free goody. If your order is over $150 don't use the code as you get to pick out the goody yourself when you place your order. 

Till next time...
God's love and blessings!

Monday, August 15, 2022

Cocoa & Crafts Wisteria Wishes 2


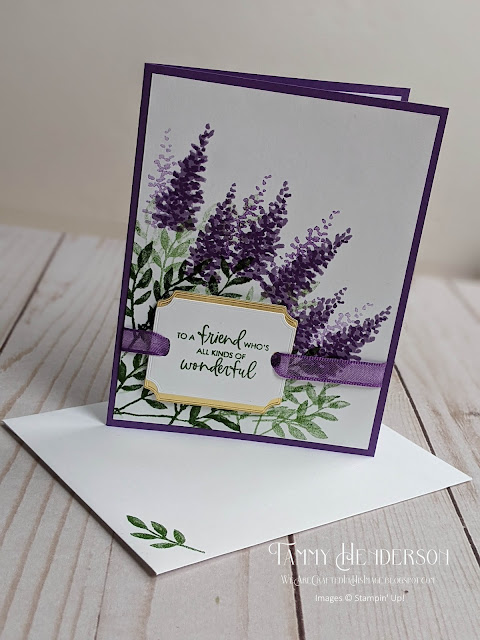
Hello there! I'm back today with the second project for this month's class. Part of the fun of this stamp set is the variety of flowers you can make. Even though the stamp set is called Wisteria Wishes, for today's card we are turning it upside down and making lilacs. 


It's a pretty simple card, allowing the flowers to take center stage. Hope you like it!


I hope you have enjoyed today's post. If you decide to place an order through my website, if your order is less than $150, please use the Host Code listed above (on the right), so I can send you an extra free goody. If your order is over $150 don't use the code as you get to pick out the goody yourself when you place your order. 

Till next time...
God's love and blessings!

Monday, August 8, 2022

Cocoa & Crafts Wisteria Wishes 1


Hello there! How are you today? I am enjoying a quiet day home alone today catching up on some to-do list items and enjoying a cooler than usual summer day. Here's the first of our projects with this month's kit. I hope you like shades of purple, because we're going to be seeing a lot of it this month. 


There are several layers to this card, so here are the measurements:

  • Card Base (Gorgeous Grape): 11 x 4 1/4
  • Sahara Sand layer: 5 3/8 x 4 1/8
  • Gorgeous Graper layer: 5 1/4 x 4
  • Basic White layer: 5 1/8 x 3 7/8
  • Inside layer: 5 1/4 x 4
Here's what I used to make this card:


I hope you have enjoyed today's post. If you decide to place an order through my website, if your order is less than $150, please use the Host Code listed above (on the right), so I can send you an extra free goody. If your order is over $150 don't use the code as you get to pick out the goody yourself when you place your order. 

Till next time...
God's love and blessings!

Tuesday, August 2, 2022

Cocoa & Crafts Grassy Grove 4

Well, July, where did you go?!? I just realized I am a week late in getting this posted! To be fair, hubby and I spent the last two weeks working with other church members to renovate the parsonage for our new Pastor and his family, so the weeks have kind of just flown by. We painted, put in a new floor, cleaned, repaired, etc. Most afternoons when we got home I pretty much collapsed on the sofa and didn't move till bedtime. It was tiring, but so glad to be able to welcome our new Pastor and his family to a well-cared-for house. 

So, today's card is a 3D scene that stands on its own. It does fit in an envelope for mailing. I think this would be a special sympathy card to send to someone. 


The measurements are actually pretty easy. 

  • Card base: 8 1/2 x 5 1/2 scored at 4 1/4
  • Watercolor background: 4 1/8 x 5 3/8
  • 1 3/4 x 5 1/2 scored at 3/8, 7/8, 1 3/8
Thankfully there are 5 Tuesdays in August, so I will be back next week with the first of our next Cocoa & Crafts videos. Hope to see you then! 


I hope you have enjoyed today's post. If you decide to place an order through my website, if your order is less than $150, please use the Host Code listed above (on the right), so I can send you an extra free goody. If your order is over $150 don't use the code as you get to pick out the goody yourself when you place your order. 

Till next time...
God's love and blessings!

Monday, July 18, 2022

Cocoa & Crafts Grassy Grove 3


Hello there! How has your week been? Our daughter and family came out for a visit last week and we had so much fun! I enjoyed getting to explore our property with my grandson and letting him help in the garden and pick berries. He's 5, which is such a fun age. Of course I also got lots of snuggles in with his little sister. 

Exploring the creek in our woods

I hope you enjoy making this week's project. Once again we're going to do a bit of water coloring. I absolutely love just watching the color flow around on the paper. It's kind of magical! 


The measurements for this card are super simple, just a basic card base with 4 x 5 1/4 watercolor panel on the front and another one inside. Super easy. 


I hope you have enjoyed today's post. If you decide to place an order through my website, if your order is less than $150, please use the Host Code listed above (on the right), so I can send you an extra free goody. If your order is over $150 don't use the code as you get to pick out the goody yourself when you place your order. 

Till next time...
God's love and blessings!

Monday, July 11, 2022

Cocoa & Crafts Grassy Grove 2


Hello there! Welcome to my crafty corner of the web. Today we are working on the second project in this month's Cocoa & Crafts class. As I mentioned before, this is World Watercolor Month and we are going to play with some watercoloring techniques. You will find that no matter how many times you do this, none of your results will look the same. 


This card has a little bit of a fun fold to it that almost makes you feel like you just walked out of the woods onto a beautiful lakeshore. Once you open it all the way, there is plenty of room to write a note to someone. I think this would work especially well as a sympathy card. 


Measurements: 
  • Black base 4 1/4 x 11 scored at 5 1/2
  • White base 4 1/8 x 10 3/4 scored at 5 3/8
  • Watercolor layer 4 x 5 1/4
Supplies:


I hope you have enjoyed today's post. If you decide to place an order through my website, if your order is less than $150, please use the Host Code listed above (on the right), so I can send you an extra free goody. If your order is over $150 don't use the code as you get to pick out the goody yourself when you place your order. 

Till next time...
God's love and blessings!

Wednesday, July 6, 2022

A Wonderful World Faux Fabric Card


Hello there! I'm here to share a pretty card I made last week. I saw this technique online and thought it went perfectly with the Wonderful World Sale-a-bration set. I also added in greenery and splotches from the Nature's Prints set. I think that is one of my favorite all around sets as it has versatile sentiments in a beautiful font, and some simple greenery and images that can be used for just about any card. 


The background texture was made by adhering a crumpled piece of tissue paper over a stamped background. I'm not sure if there is a name for the technique, but it does give it the look and feel of wrinkled fabric. 


I realized after I finished the video that I forgot to adhere the inside panel. This is what it looks like inside the card. 

Here are the items I used to make this card. 


I hope you have enjoyed today's post. If you decide to place an order through my website, if your order is less than $150, please use the Host Code listed above (on the right), so I can send you an extra free goody. If your order is over $150 don't use the code as you get to pick out the goody yourself when you place your order. 

Till next time...
God's love and blessings!

Monday, July 4, 2022

Cocoa & Crafts Grassy Grove 1


Hello there! I'm excited to start another round of Cocoa & Crafts today. I opted for the Grassy Grove stamp set for this class as I had special requests for either masculine or sympathy cards, and I thought this set could work well for both of those. You will notice as we go through the projects this month that each one uses a watercolor technique. When I designed the projects I had no idea that this month is World Watercolor Month. How cool is that? 

We're going to start off with a pretty simple card. The additional step of using a little water on the stamped image helps give it a watercolored look and also fills in the image making it look fuller. I kept my card blank, but there is space in the upper right to add a sentiment of your choice. 


Measurements:
  • Card Base 5 1/2 x 8 1/2
  • Soft Suede layer 4 1/2 x 3 1/2
  • Watercolor layer 4 1/4 x 2 5/8
Supplies:


I hope you have enjoyed today's post. If you decide to place an order through my website, if your order is less than $150, please use the Host Code listed above (on the right), so I can send you an extra free goody. If your order is over $150 don't use the code as you get to pick out the goody yourself when you place your order. 

Till next time...
God's love and blessings!

Wednesday, June 29, 2022

A Hand-Penned Partial Die Cut


Hello there! I have been having fun in the crafty space lately. I said I wanted to go through my sets, alphabetically, but that didn't work. Instead, I found some technique inspirations and then found a stamp set that would work with it. 

This card uses the partial die cut technique. Basically, you stamp the image on your card front, and then when you make your die cut "sandwich", you simply don't place the top plate across the whole image. The machine will only cut whatever is under the top plate, so by putting the plate across only part of the image, you will cut out only part of it. Then it's just a matter of using your paper trimmer or scissors to cut from the edge of your card to the die cut. Here's a link to a tutorial if you need a visual. 

The paper strip I used on the inside is 1 inch wide and comes from the Symbols of Fortune Designer Series Paper. It's on sale right now, but it retires in a couple days, so if you like it, don't wait! One other tip, I stamped the larger flowers in Calypso Coral, but I stamped onto scrap paper first to give me a lighter color. 

Here's what I used for this card: 


I hope you have enjoyed today's post. If you decide to place an order through my website, if your order is less than $150, please use the Host Code listed above (on the right), so I can send you an extra free goody. If your order is over $150 don't use the code as you get to pick out the goody yourself when you place your order. 

Till next time...
God's love and blessings!

Monday, June 27, 2022

Cocoa & Crafts Blessings of Home 4


 Hello there! Today we are finishing up this round of Cocoa & Crafts. I think this is one of my favorite sets to work with. These flowers are so pretty, and so fun to color. Speaking of coloring, you get to color yours with whatever medium you wish for this card, but I do have links below to the Blends that I used to color mine. 


Using the Basic Black marker to color the edges of the die cut really helps to make the flowers pop off the card. It's a rather simple trick that makes a huge difference. 

The measurements are pretty simple as it's just a basic card base (5 1/2 x 8 1/2) and the black card front is 5 1/2 x 4 1/4 with about 3/4 of an inch trimmed off with the scallop die.


I hope you have enjoyed today's post. If you decide to place an order through my website, if your order is less than $150, please use the Host Code listed above (on the right), so I can send you an extra free goody. If your order is over $150 don't use the code as you get to pick out the goody yourself when you place your order. 

Till next time...
God's love and blessings!

Friday, June 24, 2022

Artistically Inked Thank You Card


Hello there! I had some fun in my crafty space this week. It's been a long time since I've made a card just for the fun of making it. I'm generally designing cards for classes or kits, and there's always some limitations to those (simplicity, supplies, tools, etc.), but this time I got to just create and use whatever supplies, techniques I wanted. I simply love how this came out. 

I pulled out the Artistically Inked stamp set and decided I wanted to make something with it using Merry Merlot. This is a color I really don't use much. In fact, I don't think I've used it since Christmas. It's such a beautifully deep red color which was perfect for my "roses". I wanted something elegant looking so I pulled out Soft Suede and some gold to go with it. I die cut portions of the coordinating die from our Rose Gold Metallic Specialty Paper. I like that the pink color is a lighter shade of the Merry Merlot. I did opt to fussy cut the flowers and leaves rather than using the dies for those as I didn't want the white outline around the edges. 


The background paper I made by stamping the large texture image from the stamp set multiple times onto a piece of Crumb Cake. I used a blending brush to add shading of more Soft Suede all over, concentrating more color on the edges and then ran it through the Timber 3D embossing folder.  I lightly marked where the sentiment was going to go and tore the paper around that area and down the side. I used my fingers and bone folder to rough up the edges a bit and added some more color with the blending brush to the folded over parts of the paper. After I embossed the sentiment on the Merry Merlot cardstock I realized I wanted some gold accents elsewhere on the card, so I touched my finger to a Versamark pad and then lightly rubbed that in various places on the Crumb Cake layer and dusted it with gold embossing powder and embossed. I love how it just highlights some areas of the woodgrain. 

I hope you like this card as much as I do. I think I'm going to give myself a challenge to work my way through my stamp sets alphabetically. I have several that have not seen ink for quite a while, and I think it will be fun to pull them out and play with them again. 

Here's what I used to make this card:


I hope you have enjoyed today's post. If you decide to place an order through my website, if your order is less than $150, please use the Host Code listed above (on the right), so I can send you an extra free goody. If your order is over $150 don't use the code as you get to pick out the goody yourself when you place your order. 

Till next time...
God's love and blessings!

Monday, June 20, 2022

Cocoa & Crafts Blessings of Home 3

Hello there! Summer has finally arrived here in Wisconsin and I am so happy that my crafty space has air conditioning. This Grammy is not fond of hot weather, not at all. So, I spent as little time as possible in the garden early this morning, and planning on spending the rest of the day crafting in my cool crafty space. 😊

This week we are making this beautiful covered notepad. I think it's one of my favorite projects I've made in a while. I plan on making some more of these to sell at craft shows later this year. I do make a boo boo in the video, so you might want to watch first before you start assembling so you don't make the same mistake I did and have to disassemble to fix. 


 Measurements:

  • Base: 8 1/2 x 11 scored on the long side at 5 1/8 & 5 3/8
  • Petal Pink layer: 8 1/4 x 4 7/8
  • Crumb Cake layer: 8 x 4 5/8
Supplies:


I hope you have enjoyed today's post. If you decide to place an order through my website, if your order is less than $150, please use the Host Code listed above (on the right), so I can send you an extra free goody. If your order is over $150 don't use the code as you get to pick out the goody yourself when you place your order. 

Till next time...
God's love and blessings!

Monday, June 13, 2022

Cocoa & Crafts Blessings of Home 2


Hello there! I'm back with project #2 for this month's class. We added a bit of the Petal Pink to our Soft Suede/Smoky Slate palette from last week. We are also pulling in some of the dies that coordinate with this stamp set to make a pretty bouquet of flowers. 


Measurements for this card:

  • Basic Gray card base: 11 x 4 1/4 scored at 5 1/2
  • Smoky Slate strips: 1/2 x 4 1/4
  • Petal Pink layer: 4 1/4 x 4 1/4
  • Sentiment strip 1/2 x 3 trimmed down
  • Inside Basic White panel: 5 1/4 x 4


I hope you have enjoyed today's post. If you decide to place an order through my website, if your order is less than $150, please use the Host Code listed above (on the right), so I can send you an extra free goody. If your order is over $150 don't use the code as you get to pick out the goody yourself when you place your order. 

Till next time...
God's love and blessings!

Monday, June 6, 2022

Cocoa & Crafts Blessings of Home 1


Hello there! Today we are starting our June Cocoa & Crafts Class with the Blessings of Home stamp set. So, so pretty! I opted for an unusual color combination. Soft Suede and Smoky Slate give it a very vintage, sepia look. It's a simple card to put together, and really doesn't take too much time, even with the coloring. In the video, I show you a simple way to water color the flowers using ink and some water. 


The measurements for this card are:

  • Card base: 8 1/2 x 5 1/2, scored at 4 1/4
  • Soft Suede layer: 3 3/4 x 5
  • Basic White layer: 3 1/8 x 4 3/8
  • Sentiment and Smoky Slate strips: 1/2 x 5


I hope you have enjoyed today's post. If you decide to place an order through my website, if your order is less than $150, please use the Host Code listed above (on the right), so I can send you an extra free goody. If your order is over $150 don't use the code as you get to pick out the goody yourself when you place your order. 

Till next time...
God's love and blessings!