Wednesday, September 27, 2023

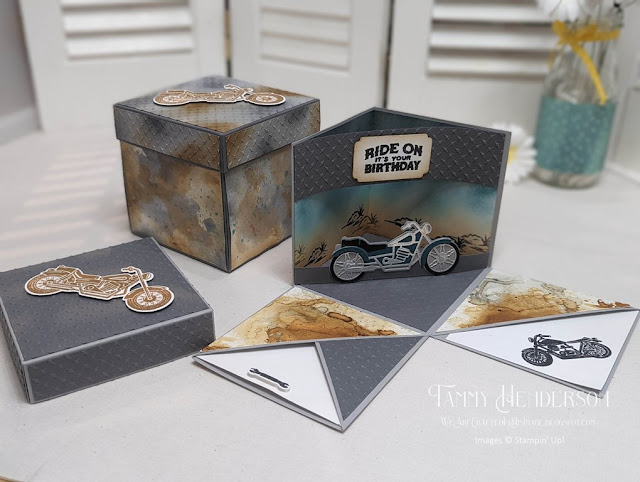
3D Thursday Legendary Ride Surprise Box


Hello there! I have a super fun 3D project today. This little box is actually a fancy way to give a gift card to someone. Once you take the lid off, the sides fall down to show a little diorama scene. One flap holds a gift card while the other gives you a place to write a little note to the recipient. 


I make quite a few holiday themed boxes like this to sell at craft shows each year, but I believe this is the first birthday themed one I've done. I'm going to have to play around with some feminine birthday and anniversary themed ones next. 

Measurements: 

  • Box lid 8 1/8 x 8 1/8 scored at 1, 2, 6 1/8 and 7 1/8 on both sides. See pattern below and video to trim. 
    • Top panel 4 x 4 
    • Sides 7/8 x 4

  • Box base 12 x 12 scored at 4, 8 on both sides. See pattern below and video to trim. 
    • Outside panels 3 7/8 x 3 7/8
    • Inside large triangles 3 3/4 square cut in half
    • Inside small rectangle 2 5/8 square cut in half
    • Bottom square panel 3 7/8 x 3 7/8
    • Title banner 1 1/2 x 6
    • Motorcycle strip 1/2 x 6 1/2 scored at 1/2 and 6
    • Both pocket inserts are 3 7/8 wide. See video on how to measure depth. 
    • Back panel 3 7/8 x 7 3/4 scored at 3 7/8

See my E is for Embossing post to see how I made the pattern paper. 

What do you think? Isn't this a nice way to give a gift card to someone? As I mentioned above, this is pretty easy to adapt to other occasions by simply changing out the pattern paper and stamp sets. 

I hope you have enjoyed today's post. If you decide to place an order through my website, if your order is less than $150, please use the Host Code listed above (on the right), so I can send you an extra free goody. If your order is over $150 don't use the code as you get to pick out the goody yourself when you place your order. 

Till next time...
God's love and blessings!

Tuesday, September 19, 2023

Technique Tuesday H is for Half Cut Die Cut


Hello there! I'm back today to continue our alphabetical journey through some fun paper crafting techniques. Today's project showcases how to cut out just a portion of a die, leaving the rest of the image uncut. I've used the technique to make a pretty little post-it note holder. 


Measurements for this card:

  • Card base - 11 x 4 1/4 scored at 5 1/2 
    • after stamping, score at 2 3/4 (see video)
  • Post-it base - 3 1/2 x 4 1/4

This card also uses Stampin' Write markers instead of ink pads to get a multi-colored image with each stamp. I definitely prefer the "watercolor" look of the card on the right. Which do you prefer? 


I hope you have enjoyed today's post. If you decide to place an order through my website, if your order is less than $150, please use the Host Code listed above (on the right), so I can send you an extra free goody. If your order is over $150 don't use the code as you get to pick out the goody yourself when you place your order. 

Till next time...
God's love and blessings!

Wednesday, August 30, 2023

Cocoa & Crafts Seasonal Blooms 4


Hello there! We are on the last project for this month's Cocoa & Crafts. Sorry I'm a little late in posting the video. 


For this card we are using a mask to blend a little color onto the middle of the card front to give our birds and branches a focal point without adding any bulk to the card. I also show you how to use our silicone craft mat to make a mirror image of the cute little bird. 


Very basic measurements for this card: 

  • Card base - 8 1/2 x 5 1/2 scored at 4 1/2
  • Inside and outside panels - 4 x 5 1/4
What do you think? I hope you enjoyed this month's projects. Now that summer is winding down, I'm hoping to be able to spend a bit more time in my crafty space. I'm looking forward to sharing whatever fun projects I come up with, especially since the holidays will be here before we know it! 

I hope you have enjoyed today's post. If you decide to place an order through my website, if your order is less than $150, please use the Host Code listed above (on the right), so I can send you an extra free goody. If your order is over $150 don't use the code as you get to pick out the goody yourself when you place your order. 

Till next time...
God's love and blessings!

Tuesday, August 22, 2023

Cocoa & Crafts Seasonal Branches 3


Hello there! Today's card is the third project in our Seasonal Branches Cocoa & Crafts Class. I found that my stash of sympathy/thinking of you cards was getting low, and this sweet little set is perfect for cards like this. 

I do love this tearing technique with the branch and bird popping out from behind. What do you think?


Measurements:

  • Card base - 8 1/2 x 5 1/2 scored at 4 1/4
  • White panel - 4 x 5 1/4
  • Boho Blue Panel 3 x 4 1/4


I hope you have enjoyed today's post. If you decide to place an order through my website, if your order is less than $150, please use the Host Code listed above (on the right), so I can send you an extra free goody. If your order is over $150 don't use the code as you get to pick out the goody yourself when you place your order. 

Till next time...
God's love and blessings!

Monday, August 14, 2023

Cocoa & Crafts Seasonal Branches 2


Hello there! Sorry I haven't posted as much as usual the last few weeks. We have been traveling and super busy with summer stuff lately. It's harvest season, so I'm busy most days in the garden or out picking berries in the woods and then processing things. I also spend two weeks teaching Pioneer School in the summer, so things have just been busy, busy around here. 

I am super excited about this project. I found these honey sticks at our local Farmer's Market and picked up a bunch of them with plans to make some kind of project with them. It took quite a few pieces of scrap paper and planning, but I really like how it came out. 


This would be a sweet little gift to give to someone who's feeling a little under the weather. Maybe tuck it into a basket along with some chicken noodle soup and some crackers or bread. What a sweet way to let someone know you're thinking about them and hoping they are feeling better soon. 


Measurements for this project:

  • Boho Blue base - 5 1/2 x 8 1/2 scored at 3 1/2 and 7
  • Basic White wrap - 4 1/2 x 8 1/2


I hope you have enjoyed today's post. If you decide to place an order through my website, if your order is less than $150, please use the Host Code listed above (on the right), so I can send you an extra free goody. If your order is over $150 don't use the code as you get to pick out the goody yourself when you place your order. 

Till next time...
God's love and blessings!

Sunday, August 6, 2023

Cocoa & Crafts Seasonal Branches 1


 Hello there! It's time for another round of Cocoa & Crafts. This month we are playing with the Seasonal Branches set. This is a simple card, but I love the sentiment as it can be used for several of those occasions that we really wish we didn't have to have a card for, but often do, such as sympathy, get well, or for someone who is just feeling down. It's a sweet card to let someone know you care for them. 


Measurements: 

  • Card base - 5 1/2 x 8 1/2 scored at 4 1/4
  • Crumb Cake panel - 4 1/2 x 3 1/4


I hope you have enjoyed today's post. If you decide to place an order through my website, if your order is less than $150, please use the Host Code listed above (on the right), so I can send you an extra free goody. If your order is over $150 don't use the code as you get to pick out the goody yourself when you place your order. 

Till next time...
God's love and blessings!

Tuesday, July 25, 2023

Technique Tuesday G is for Gilding


 Hello there! We are on to the letter G in our Technique Tuesday line up, and G is for gilding. This card uses our Gilded Leafing and I show you three ways to adhere it to your design. The Gilded Leafing is a pretty way to add a muted gold glimmer to your projects. 


Measurements:
  • Card base 8 1/2 x 5 1/2 scored at 4 1/4
  • Front and inside panels 5 1/4 x 4


I hope you have enjoyed today's post. If you decide to place an order through my website, if your order is less than $150, please use the Host Code listed above (on the right), so I can send you an extra free goody. If your order is over $150 don't use the code as you get to pick out the goody yourself when you place your order. 

Till next time...
God's love and blessings!


Tuesday, July 18, 2023

Technique Tuesday F is for Faux Pressed Flowers


Hello there! Welcome to another Technique Tuesday. Tissue paper is a fun way to make some faux pressed flowers. Tissue paper is light and ethereal, and its translucence allows the stamped image to show through creating veins and details on the flowers. You could simply glue the tissue over the stamped image, and leave it at that, but it adds a bit more dimension if you then emboss them all together. 

Measurements for this card:

  • Card base 5 1/2 x 8 1/2 scored at 4 1/4
  • Boho Blue and Very Vanilla panels 5 1/4 x 4


I hope you have enjoyed today's post. If you decide to place an order through my website, if your order is less than $150, please use the Host Code listed above (on the right), so I can send you an extra free goody. If your order is over $150 don't use the code as you get to pick out the goody yourself when you place your order. 

Till next time...
God's love and blessings!

Tuesday, July 11, 2023

Technique Tuesday E is for Embossing


Hello there! For this week's Technique Tuesday we are on to the letter E, which is for embossing. We will do both dry and heat embossing, and even the emboss resist technique. 

I really, really love the grungy look of the background, and it was so fun to do! It is so not like me to do a masculine card, but I may have to find more ways to use that grungy background on other cards 'cause it just came out so cool. I could totally see this with the Legendary Ride set!!


Measurements for this card:
  • Card Base 5 1/2 x 8 1/2 scored at 4 1/4
  • Front and inside panels 5 1/4 x 4
  • Smoky Slate strip 5 1/4 x 1


I hope you have enjoyed today's post. If you decide to place an order through my website, if your order is less than $150, please use the Host Code listed above (on the right), so I can send you an extra free goody. If your order is over $150 don't use the code as you get to pick out the goody yourself when you place your order. 

Till next time...
God's love and blessings!

Friday, July 7, 2023

Fun Fold Friday - Seasonal Branches


Hello there! It's Fun Fold Friday! By adding a few extra score lines to your card, you can make the front pop out a bit to give your image some dimension. I had fun playing with the flowers in the Seasonal Branches Die set. I love that the die not only cuts the flowers, but adds a bit of embossed veining details as well. 


As promised, here are the measurements for this card:

  • Card base - 4 1/4 x 11 
    • scored on the long side at 1/4, 1/2, 5, 5 1/4, 5 1/2, 5 3/4, 6, 10 1/2, 10 3/4
That's it! Coloring and adhering the flowers is a little bit fiddly, but the finished card is worth it, I think. 


I hope you have enjoyed today's post. If you decide to place an order through my website, if your order is less than $150, please use the Host Code listed above (on the right), so I can send you an extra free goody. If your order is over $150 don't use the code as you get to pick out the goody yourself when you place your order. 

Till next time...
God's love and blessings!

Tuesday, July 4, 2023

Technique Tuesday D is for Debossed Die Resist


Hello there! Today's Technique Tuesday is a Debossed Die Resist technique. Using a special embossing mat, you can use your cutting dies to emboss an image onto cardstock rather than cutting it out. Instead of using the embossed side of the cardstock, I've opted to add a bit of "wax" to the debossed side which will resist the watercolor, leaving behind white outlines of the image. 


What do you think? I think it's a great way to use some of our more intricate dies. That, and I always enjoy playing with watercolor. So fun, and imperfect. 

Measurements

  • Card base - 5 1/2 x 8 1/2 scored at 4 1/4
  • Flirty Flamingo panel - 5 1/4 x 4
  • Watercolor panel - 5 x 3 3/4
  • Inside panel - 5 1/4 x 4


I hope you have enjoyed today's post. If you decide to place an order through my website, if your order is less than $150, please use the Host Code listed above (on the right), so I can send you an extra free goody. If your order is over $150 don't use the code as you get to pick out the goody yourself when you place your order. 

Till next time...
God's love and blessings!

Thursday, June 29, 2023

3D Thursday - Vibrant Petal Park Bag


 Hello there! Isn't this such a fun bag?!? I love how the colors just pop off that black background. I was so excited when I found out we can get an embossed image in pretty much any color we want, AAAAND, it's super easy! 


This is a good size bag to put little treats in. You could fit a tiny notepad and pen, along with some chocolates, or maybe some travel sized body care products with a tealight candle. I think it's the perfect size to give someone a little treat for no particular reason other than to brighten up their day. 

Measurements for this bag:

  • Bag 6 x 11
    • scored on long side at 3 1/2, 5 1/4, 8 3/4, 10 1/2
    • scored on short side at 1 3/4
  • Flirty Flamingo panel 4 x 3 1/4
  • Basic Black panel 3 3/4 x 3
  • Handles 10" 

So, who would you give this little bag to and what kind of goodies would you put in? 


I hope you have enjoyed today's post. If you decide to place an order through my website, if your order is less than $150, please use the Host Code listed above (on the right), so I can send you an extra free goody. If your order is over $150 don't use the code as you get to pick out the goody yourself when you place your order. 

Till next time...
God's love and blessings!

Monday, June 26, 2023

Technique Tuesday C is for Cling Wrap "Painting"

Hello there! I'm back with another Technique Tuesday. This week we are on to the letter "C" which stands for Cling Wrap. We're going to use this kitchen product to make a beautiful "painted" background to use on our card. It's pretty simple to do, and you'll never get the same results twice. 


What do you think? Try this out with different colors. I paired some blues and grays with the Legendary Ride stamp set to get a more masculine card. Same layout, totally different feel. I've kept both cards blank as I'm not sure what I'm going to use them for right now. Might just use them as notecards. 


I hope you have enjoyed today's post. If you decide to place an order through my website, if your order is less than $150, please use the Host Code listed above (on the right), so I can send you an extra free goody. If your order is over $150 don't use the code as you get to pick out the goody yourself when you place your order. 

Till next time...
God's love and blessings!

Wednesday, June 7, 2023

Throwback Thursday - On the Ocean


 Hello there! I'm sorry it has been a little while. We had several out-of-state graduations to attend and then also moved our youngest out of her dorm and bedroom here and into an apartment. Needless to say, my schedule has been a bit full. 

This card was actually designed from one of my trips. My daughter asked me to bring some birthday cards my grandson could use for his friends, so I pulled out the retired Magical Day stamp set for those. After designing the cards, I realized the layout would work really well for some graduation cards I needed to make for my husband to use for his students. Since their mascot is a pirate, On the Ocean was the perfect set to use. 


The card is super simple, which makes it a great choice for cards that you need to make multiples of. 

Measurements:

  • Card base - 5 1/2 x 8 1/2 scored at 4 1/4
  • Black panel - 5 1/4 x 4
  • White outside panel - 5 1/8 x 3 7/8
  • Black strip - 1/2 x 4
  • White inside panel - 5 1/4 x 4


I hope you have enjoyed today's post. If you decide to place an order through my website, if your order is less than $150, please use the Host Code listed above (on the right), so I can send you an extra free goody. If your order is over $150 don't use the code as you get to pick out the goody yourself when you place your order. 

Till next time...
God's love and blessings!

Sunday, May 28, 2023

Cocoa & Crafts Irresistible Blooms 4


Hello there! We're on our last project for this month's Cocoa & Crafts class. I hope you've enjoyed all of the projects. I really, REALLY like this stamp set and paper! We're going to finish off with a super simple treat bag using one of the 6 x 6 sheets of the paper. 


Measurements:
  • 6 x 6 
    • score across bottom at 1 3/8
    • cut up to score line at 1 3/8, 2 3/4, 4 1/8, 5 1/2
Not a lot of supplies for this one. So, which sheet did you choose to use for your treat bag?


I hope you have enjoyed today's post. If you decide to place an order through my website, if your order is less than $150, please use the Host Code listed above (on the right), so I can send you an extra free goody. If your order is over $150 don't use the code as you get to pick out the goody yourself when you place your order. 

Till next time...
God's love and blessings!

Sunday, May 21, 2023

Cocoa & Crafts Irresistible Blooms 3


Hello there! I won't be posting much the next couple of weeks as I will be on a couple of trips to celebrate graduations. I hope to be back to a regular schedule in June though. Today's card is a super simple card that could really be used for any occasion simply by switching out the sentiment. I love that we are able to use the half-flowers from the edges of the Designer Series Paper for this one. Don't want to waste any of that pretty paper! 


Measurements for this card:

  • Card base - 5 1/2 x 8 1/2 scored at 4 1/4
  • Front frame - 5 1/2 x 4 1/4 with a 4 x 2 5/8 rectangle cut from the middle


I hope you have enjoyed today's post. If you decide to place an order through my website, if your order is less than $150, please use the Host Code listed above (on the right), so I can send you an extra free goody. If your order is over $150 don't use the code as you get to pick out the goody yourself when you place your order. 

Till next time...
God's love and blessings!

Monday, May 15, 2023

Technique Tuesday B is for Box Card


Hello there! We are onto the B's for our Technique Tuesday, and B is for Box Card. Now if I got a box full of goodies, I would definitely want it to be full of craft supplies. What fun! 

This card will fold flat to go in an envelope, and then pops up to be displayed. 


Measurements: 

  • Card Base - 4 1/4 x 11
    • scored on long side at 2, 5 1/4, 7 1/4, 10 1/2
    • scored on short side at 2 (see video to see where to stop score line)
    • trim three flaps to 1 inch (see video)
  • Inserts - 2 1/4 x 4 1/2
    • scored on long side at 1/2 and 3 3/4


I hope you have enjoyed today's post. If you decide to place an order through my website, if your order is less than $150, please use the Host Code listed above (on the right), so I can send you an extra free goody. If your order is over $150 don't use the code as you get to pick out the goody yourself when you place your order. 

Till next time...
God's love and blessings!

Cocoa & Crafts Irresistible Blooms 2

Hello there! Today's Cocoa & Crafts project is a simple card with minimal stamping. We're going to use images from the Hello, Irresistible Designer Series Paper as our focal point. You get to choose what color flowers you want to use on each of your cards. 


Measurements: 

  • Card base - 8 1/2 x 5 1/2 scored at 4 1/4
  • Embossed front panel - 4 x 5 1/4


I hope you have enjoyed today's post. If you decide to place an order through my website, if your order is less than $150, please use the Host Code listed above (on the right), so I can send you an extra free goody. If your order is over $150 don't use the code as you get to pick out the goody yourself when you place your order. 

Till next time...
God's love and blessings!

Wednesday, May 10, 2023

3D Thursday - Lighting the Way


Hello there! Today's 3D Thursday is a fun light-up tent card showcasing the super cute fireflies in the Lighting the Way stamp set. Aren't they cute!?! Some simple vellum "windows" and a battery operated tealight are the secret to helping our little bugs light up. 


Measurements: 
  • Card base - 12 x 5 1/2 scored at 4 1/4 and 8 1/2
  • Front panel - 4 x 5 1/4
  • Inside panel - 3 1//4 x 5 1/4
  • Stopper piece - 1/2 x 5 1/2

This card is actually pretty simple to do and folds up nicely to fit in a standard medium envelope. 


I hope you have enjoyed today's post. If you decide to place an order through my website, if your order is less than $150, please use the Host Code listed above (on the right), so I can send you an extra free goody. If your order is over $150 don't use the code as you get to pick out the goody yourself when you place your order. 

Till next time...
God's love and blessings!

Sunday, May 7, 2023

Cocoa & Crafts Irresistible Blooms 1


Hello there! Whew! It's been a while, but we are back with another round of Cocoa & Crafts. First there was a supply issue, and then a shipping issue, so we had to postpone the April class until May, but it is such a pretty stamp set that it is worth the wait. 

Our first project this month is a pop up card that highlights the pretty Hello Irresistible Designer Series Paper. Super fun, but quick project today. 


The DSP is cut in such a way that you get two slightly different cards from one sheet of 6 x 6 paper with no scraps left over. 


Measurements for this card:

  • Card base - 11 x 4 1/4 scored at 2 3/4 and 5 1/2
  • Card front - 5 1/2 x 4 1/4
  • Designer Series Paper front panel - 6 x 3 (trimmed after adhering to front-see video)
  • Designer Series Paper inside panel - 2 1/2 x 4
  • Stopper piece - 1/2 x 4 1/4


I hope you have enjoyed today's post. If you decide to place an order through my website, if your order is less than $150, please use the Host Code listed above (on the right), so I can send you an extra free goody. If your order is over $150 don't use the code as you get to pick out the goody yourself when you place your order. 

Till next time...
God's love and blessings!

Wednesday, May 3, 2023

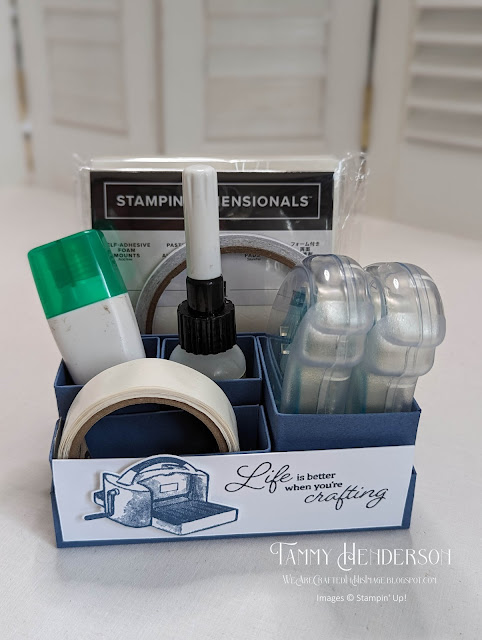
3D Thursday - Adhesive Storage


Hello there! Today's 3D Thursday project is a storage box to organize all your adhesives. It consists of 5 little boxes that nestle into a matching tray. I have a couple of areas in my crafty space that I work and I needed something that was easy to move from one table to the next and not take up too much valuable real estate. This was the perfect project to use the new Crafting With You stamp set. 

I designed the boxes with a double layer of cardstock to give them a bit more stability. It makes it a little more difficult to fold up, but they will last longer that way. There are a lot of measurements for this project. Check out below the video for measurements and "maps" to help you see where to score and cut. 


Tray: 9 1/4 x 8 1/4

  • scored on long side at 1, 2, 7 1/4, 8 1/4
  • scored on short side at 1, 2, 6 1/4, 7 1/4

Stampin' Seal box: 10 x 6
  • scored on long side at 2, 4 1/2, 6 1/2, 9
  • scored on short side at 2, 4

Liquid Glue boxes (you will need 2 of these): 7 x 5 1/2
  • scored on long side at 1 1/2, 3, 4 1/2, 6
  • scored on short side at 2, 4

Glue Dots box: 8 1/2 x 4 (You will notice this one has a smaller tab than the others. That's to save on cardstock as you can cut straight across an 8 1/2 x 11 sheet.)
  • scored on long side at 1, 4, 5, 8
  • scored on short side at 1 1/2, 3

Dimensionals/Tear-n-Tape box (you will two of these panels to make one box): 7 1/2 x 5 1/2
  • scored on long side at 1 1/2, 6 1/2
  • scored on short side at 2, 4

I hope you like this project. We have so many pretty colors to choose from, what color will you make your organizer? I hope this will help to keep your crafty space organized and easy to find what you need to create some amazing projects. 


It's a very short list of supplies for this project: 


I hope you have enjoyed today's post. If you decide to place an order through my website, if your order is less than $150, please use the Host Code listed above (on the right), so I can send you an extra free goody. If your order is over $150 don't use the code as you get to pick out the goody yourself when you place your order. 

Till next time...
God's love and blessings!

Monday, May 1, 2023

Technique Tuesday A is for Acetate


Hello there! I'm starting a new Technique Tuesday series. I am going to go through the alphabet coming up with techniques for each. Some letters might have more than one technique to showcase. We'll see how it goes. 

We'll start this series with A, of course, and A is for acetate. I actually use acetate or, Window Sheets as Stampin' Up! calls them, in three different ways for this card. 


So, which card do you like better? We could almost play a Spot The Difference game with these two cards. The backgrounds are different colors. When I did the first one, I didn't have the new In Color markers yet. The ships are different colors and the clouds are in a different configuration (I like the dark cloud in the back better). And, of course, the birds are flying in different directions. 


The measurements for this card:
  • Card base - 6 1/4 x 5 1/2 
    • scored at 1/2, 4 3/4, 5 1/4, & 5 3/4 on long side
  • Water color panel - 4 x 5 1/4
  • Window Sheet - 4 1/4 x 5 1/2
  • Sentiment strip - 1/2 x 4 cut down to fit


I hope you have enjoyed today's post. If you decide to place an order through my website, if your order is less than $150, please use the Host Code listed above (on the right), so I can send you an extra free goody. If your order is over $150 don't use the code as you get to pick out the goody yourself when you place your order. 

Till next time...
God's love and blessings!