Hello there! Here we are in the last week of September already, and our last project for this month's Cocoa & Crafts class. These boxes are super cute, and super easy to make! I chose to make one with a yellow and green, summery palette and one with a more fall like palette. Bonus: a Ghirardelli square fits perfectly in them!
Monday, September 27, 2021
Cocoa & Crafts 9-4
Monday, September 20, 2021
Cocoa & Crafts 9-3
Hello there! While it felt like summer yesterday, today it's a blustery fall day. I do love fall! Hot drinks, warm sweaters and snuggling with my hubby--doesn't get much better than that.
Today's card is a pretty blank card that could be used for a multitude of different occasions. In the video I give you some tips and tricks to use our Stampin' Spritzers along with stamps to make your own pretty background paper.
Not a difficult card to make, and you could easily switch out the colors and stamps to get a completely different look. Here are the measurements:
- Card base 8 1/2 x 5 1/2 scored on the long side at 4 1/4
- Background piece 3 1/2 x 3 1/2 cut every 5/8 inch after decorating
Friday, September 17, 2021
Sailing Home Bookmark
Hello there! I'm here today by request of one of my customers. Every month I send out thank you gifts to those who place orders and this is one of the ones I sent out recently. One of the recipients was asking about the background paper so I put a quick video together today to show how it was made.
This is definitely not a new technique, but it is SOOO much fun to do. It's quick, fun, and makes such a pretty background. I'm not sure which I like better, this or the "smooshing" technique. Anyway, I hope you like it!
Monday, September 13, 2021
Cocoa & Crafts Round 9-2
Hello there! How are you this fine day? As most of you know, I live in Wisconsin, which means that even though the calendar says it is not officially fall, the trees outside my window say otherwise. Which also means this is the perfect time to make this card!
It won't be long until my yard looks just like the front of this card. :o) I love using our ink refills to make a custom colored ink pad. No two cards and no two leaves are going to look exactly alike, and a little piece of the In Good Taste Designer Series Paper is the perfect backdrop for our fall inspired leaves.
Tuesday, September 7, 2021
Cocoa & Crafts 9-1
Hello there! How are you this fine day? It is very, very quiet in my house today as we got our daughter all moved in to her dorm last weekend and hubby is back at work. It's just me and the pups, and a very sleepy cat. Looks like I'm going to have to occupy my time with more crafting!
Before I get into today's project, I wanted to share with you a sneak peek of the next Paper Pumpkin kit. In case you haven't heard of Paper Pumpkin, it's a monthly kit subscription where you get everything you need to make the projects. They are usually cards, but this month's is different. I love that they are giving us little peeks as to what to expect, and I absolutely can't wait for this kit! If you love this as much as I do, don't wait. You only have until September 10th to subscribe.
Here's what Stampin' Up! has to say about this month's kit: Experience everything the autumn season has to offer with the Haunts & Harvest Paper Pumpkin Kit! This month’s kit includes enough supplies to create 12 treat boxes—4 each of 3 designs. That means you can take your pick of apple, pumpkins, or jack-o-lantern treat boxes! Plus, the Paper Pumpkin box is designed to easily transform into a vintage wheelbarrow for you to display your harvest!
Whether you’re thinking about crisp red apples or you’re ready to carve some spooky jack-o-lanterns (or both!), the Haunts & Harvest Paper Pumpkin Kit—designed in a vivid fall palette—is a hands-on crafting experience for all autumn lovers!
And, speaking of Autumn, this month's Cocoa & Crafts class we are making our own stamp pads with ink refills. It's a great way to get a lovely multi-colored look, and what better stamp set to use that with than the Gorgeous Leaves? And, although we tend to think of fall with this set, you could easily switch out for shades of green and yellows to make it more of a spring/summer set as well.
Thankfully, I didn't have any technical issues with this week's video, but I did have a brain issue and realized as I was cleaning up that I'd completely forgotten a step, so be sure to watch all the way to the end because I tagged a little on there after my good-by.
There you have it, a pretty card you could use for any occasion, and a fun technique to get a different look from your stamps.
Thursday, September 2, 2021
Distressed Gorgeous Leaves Card
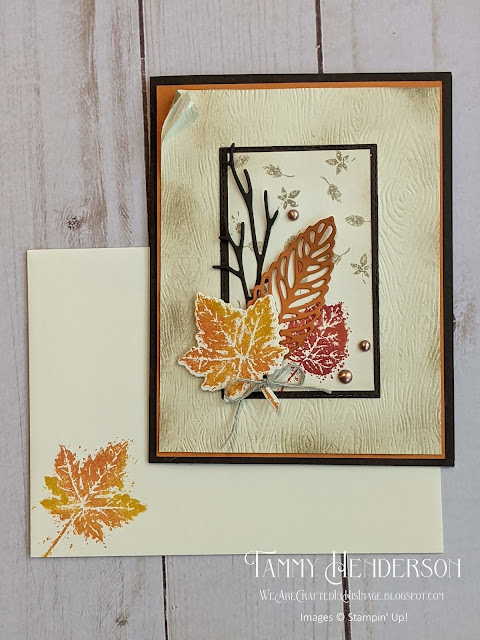
Hello there! How are you this fine day? I know for some it is still summer, but here in Wisconsin, we are getting a taste of fall weather with temps in the upper 60's. I'm actually wearing a snuggly sweater as I type this and may just have to go make myself a cup of tea, so I thought this was a perfect day to share this card with you.
Well, I'm off to finish the laundry and help my daughter finish up packing and prepping for her big move to college this weekend. Also going to go check and make sure we're well stocked on tissues, because I think my "faucets" my be more leaky than usual this weekend.


