Monday, September 1, 2014

Stamp of the Month...Something New

Hello there! It's a new month here and I thought it would be fun to try something a little different. I picked a stamp set to be my Stamp of the Month and I will post a new card or project made with that stamp set each day this month. (I will try to anyway). At the end of the month I will be giving away all those cards and projects to someone or maybe a couple of someones. :o) Not sure how I'm going to do the give-a-way yet, but I thought I'd go ahead and start posting  the projects and figure out the give-a-way a little later. Hopefully, this will help inspire both you and me to get a little creative this month.

The stamp set I chose for this month is Gorgeous Grunge. Absolutely love this set. It's so versatile and can really be used on just about any project from cards to scrapbooks. Here's my first card:
What do you think? I love this color combination: Blushing Bride, Smoky Slate, Crumb Cake, & Soft Suede. I used Petite Petals with the matching punch for the flower, and Something to Say for the sentiment.
Here it is with the coordinating envelope:
A quick tip to give smaller flowers some "life" is to use the Stampin' Pierce mat and a rounded tool. I used a paint brush in this photo, but you could use anything..even your fingers if they're small enough. Simply put the flowers on the mat and push down in the middle of them with the paint brush. Voila! instant dimensional flowers. Then just use a glue dot in the center to adhere to the card.
Can you see what I mean in this photo? The petals have a bit more life and it gives some dimension to the card.
Well, there's my first installment for the Stamp of the Month. Please leave a comment and let me know what you think.

Till next time...
God's love and blessings!

Tuesday, August 19, 2014

Technique Tuesday-Felt Flower Keychain

Hello there! Welcome to my little crafty corner. I have a tutorial for you that I actually made a month ago, but am just now getting the time to get it posted. Sorry about that. Let's just say I was busy with life. :o)

Anyway, this is a super quick project that is perfect for party favors or a fun, simple gift. It's inexpensive to make, super quick and I think it looks pretty awesome.


Well, what do you think? Cute, huh? And guess what? If you're interested in the Big Shot, this is the perfect time to get it. Stampin Up! is offering special bundles this month (August 2014) where you get a free stamp set and framelets with a Big Shot purchase. If you already own a Big Shot, you can get the bundles at a discount. Check out my page for all the details.


Well, summer is quickly fading and there are quite a few projects on my To-Do List before we start our home school schedule, so I will close this here. Hope to see you again next week!

till next time...
God's love and blessings!!

Tuesday, June 3, 2014

Technique Tuesday-Blendabilities Bookmark

Hello there! Welcome to my crafty corner of the web. Sorry I have been MIA. If you check out our family blog you will see why. :o) Busy, busy times for us.

I am so excited that Stampin' Up!'s new catalog is out. There's so many fun new stamps and accessories in there. I really wanted to try out the new Blendabilities. These are alcohol based markers that come in sets of three shades of the same color. Unlike water based markers, alcohol markers can be used over top of one another and blend well together. This makes coloring in detailed stamp images lots of fun--and easy! I decided a fun bookmark for my new catalog would be the perfect project to try these out on and of course, I made a video to share with you. Hope you enjoy.


One last thing, with the new catalog coming out, I will be hosting an Open House on June 14 from 1-7pm. Here's some of the fun I'm planning:


  • You can pick up your new catalog!
  • Shop my BOGO Sale. . . my retired product is FREE when you place an order of equal or greater value to your total of retired product!
  • Complete 3 fun projects using product from the new catalog!
  • Eat yummy treats!
  • Bring a friend that has not attended one of my events in the past and you'll both get a FREE grab bag of Stampin' Up! product!
  • Get in on prize drawings
  • Check out my Events page for more details and to RSVP if you'd like to come.

    Gotta go get my prizes ready. ;o)

    Till next time...
    God's love and blessings!

    Tuesday, April 8, 2014

    Technique Tuesday-Acrylic Watercolor Background

    Hello there! Welcome to Crafted In His Image. Life has been a crazy up and down the last couple of weeks, but I'm back with a simple and fun technique for you today.


    Watercolor seems to be very popular right now, especially at Stampin' Up!, so I thought I'd share a fun technique that will give you a watercolor background in just a couple of steps. It is the perfect backdrop for your stamps.

    I employed my 10 year old to help with the video this time. We may have had too much fun doing this. I think she enjoys my bloopers a little too much. :o) This was our 7th or 8th try with a whole lot of giggling going on in between. :o)


    Please leave me a note and let me know what you think and whether there's something you are interested in learning.

    Till next time...
    God's love and blessings!

    PS. You can sign up for my April Tips, Tools and Technique class if you'd like to make this for yourself, along with 3 other fun projects. You can check out my Events page for more info.

    Tuesday, March 25, 2014

    Technique Tuesday-Sort of

    Hello there. Please forgive me for not posting a tutorial today while we mourn the loss of a wonderful, sweet friend. I am comforted by knowing she is with the Lord in heaven, but still grieving because we will miss her oh so terribly here on earth.
    My heart is burdened as I am reminded that life here on earth is short. We are not guaranteed tomorrow. I pray that should something happen to you, your family would be comforted in knowing you are safe in the arms of Jesus.

    Unfortunately, so many are believing on their good works to get them there. "I go to church", "I'm a good person", "God is a loving god, He wouldn't condemn me to hell". The Bible teaches that God is a loving god, but He's also a just god and that there is no way to work our way into heaven. We can never be good enough. "For all have sinned and fallen short of the glory of God." Romans 3:23 But, as I said, He is a loving god. In fact, He is love. Love doesn't exist without Him. He loves us so much He sent His Son to pay our penalty for sin. "For God so loved the world (that means you!), that He sent His only Son, that whosoever believes in Him shall not perish, but have everlasting life." John 3:16.

    Belief, that's all it takes. Believing that Jesus was God, born here on earth to take our place on the cross. Believing that He overcame death and rose from the grave. Believing that we don't deserve the grace He offers us and repenting and turning away from the sin in our life. So, I guess it does take more than belief, after all, Satan believes who Christ is, yet he isn't going to spend any time in heaven. We must also be sorry for our sin, no matter how "little" we may believe it is, it's still sin and God won't allow it into heaven. We can't work our way into heaven. No matter what church we belong to, what ceremonies or rituals we are careful to do, no matter how much money we give or good deeds we do, we can't erase our sin. Only Christ can do that. "For by grace are ye saved through faith; and that not of yourselves: it is the gift of God; not of works, lest any man should boast." Ephesians 2:8-9. Did you read that? A gift. All you have to do is believe and accept it. I'm so glad my friend had accepted that gift long ago and I know she is in heaven now rejoicing with her Savior.

    If you have questions, if you're not sure what will happen to you when you die, please feel free to leave me a message and I will do my best to help.

    Lord willing, I will be back next week with a tutorial for you. In the meantime please go hug your family close.

    Till next time...
    God's love and blessings.

    Tuesday, March 18, 2014

    Technique Tuesday-Watercolor Markers

    Hello there, and welcome to my first episode of Technique Tuesday. I even tried doing my first ever video tutorial. The hardest part...figuring out how to get the camera in the right place so that it would see the project and not the top of my head-oh, and not saying "and" a bazillion times. ;o)

    I thought I would start Technique Tuesday with a simple technique I learned as a new Stampin' Up! demonstrator several years ago called Watercolor Markers. Anyway, here's my little tutorial. Please comment and let me know what you think.


    I realized too late that I should have either zoomed in so you could see the project better, or hold up the finished ones to the camera, but after all the work it took to upload this, I don't really want to re-do it. I'll have to remember that for next time. Here's a close-up photo of the technique done on the two different papers. The left is Whisper White cardstock, the right is watercolor paper.
    And here's the finished card.

    I mention in the tutorial that you can get the In Color markers for free till the end of this month (March 2014). You can check out all the details for that at the Paper Pumpkin website.

    Here's a list of the products I used:
    Whisper White Cardstock
    Stampin' Write Markers
    Aqua Painters
    Watercolor Paper
    Simply Sketched Stamp Set (You can earn this set for free by hostessing a workshop.)

    Whew! I did it! Not sure if I will do a video tutorial every week as it took over an hour to upload this 4 minute video to youtube, but I will do my best to continue Technique Tuesday, it just may be in photos instead of video. :o)

    Till next time...
    God's love and blessings!


    Saturday, March 15, 2014

    3D Blossom Punch Flower Tutorial

    Hello, hello! How are you on this fine day? I am currently enjoying a VERY quiet house as my little one is out with her Daddy today and my son is spending time with his fiance. (I have no idea how to get that little mark over the "e" in fiance.)

    Some of you may not know, but one of my other hobbies is cake decorating, and recently I was introduced to wafer paper. Edible paper. Yeah, you can see my brain going can't you? Paper I can put on my cakes? Paper I can use my punches with? Yes, please. I took a class on Craftsy to help get familiar with it and then just played around with different things to see how it worked.

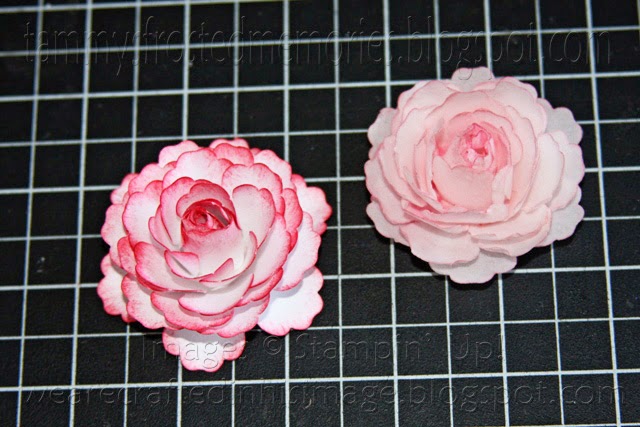
    Last night I got out one of my favorite punches and made a cardstock flower and then this morning I used similar techniques with wafer paper to make the same flower. What do you think? The flower on the left is card stock, the one on the right is wafer paper. And guess what? I took pictures making both of them so I could share with you how to make them. If you'd like to make the wafer paper flower, check out my cake blog for the tutorial.

    So, let's get started.
    Start by punching 6 flowers with the Stampin' Up! Blossom punch. Then use Paper Snips to cut in a little ways between each petal. In this photo I've only cut 4 of the 6 so you could see how far in to go.
    This next step is optional and can actually be done before the petals are snipped. I used a sponge and some Primrose Petal ink to add some color to the edges of the petals. You'll want to do this to both sides of your flowers.
    Next, take something rather narrow, I used a thin paintbrush and roll the petals of two of your flowers.
    Do the rest of the flowers the same way, but with something a bit fatter. I just used a paintbrush with a wider handle.
    You should have two flowers with tightly rolled petals, and 4 that are not so tight. (Pretend there's another flower in this photo. ;o)
    Take one of your tightly rolled petals and glue the sides together. It might help to wrap it around your paintbrush handle for this step.
    Now bring up the opposite petal and glue it to the first one. I just glued the edges, and I may have gotten it a bit tighter than it needed to be.
    Bring up two more petals that are opposite of each other. Apply glue to the edges of one of the petals and glue them to the other petal.
    Do the same with the remaining two petals, but you may need to put glue on both petals as they may not be able to stretch to each other and may need to be glued to the previous petals. (Does that make sense?) This is the center of the flower.
    Guess what? That was the hardest part of this flower. Now you just glue the center of each of the remaining flowers to the center of another, staggering the petals as you stack and make sure the other tightly rolled flower is on top. Sorry I didn't get a photo of this stacked flowers, but if you're confused, check out my wafer paper tutorial where I did remember to take a picture of this step. Glue your finished center in the middle and take all the petals and pull them up and give the whole flower a gentle squeeze to help the petals stand up.
     This is how it looks when you let go. Just gently pull down some of the petals to open the flower up a bit.
    And, voila! (There's another one of those words that needs a doohicky on top.) You have a beautiful 3D flower embellishment. I think I may glue this one onto a magnet or clothespin. 

    As much as I'd love to sit in my craft room and play with paper some more, I have 3 cakes that need to be worked on, so I will close for now. Hope you enjoyed the tutorial.

    Till next time...
    God's love and blessings!