Hello, hello! How are you on this fine day? I am currently enjoying a VERY quiet house as my little one is out with her Daddy today and my son is spending time with his fiance. (I have no idea how to get that little mark over the "e" in fiance.)
Some of you may not know, but one of my other hobbies is cake decorating, and recently I was introduced to wafer paper. Edible paper. Yeah, you can see my brain going can't you? Paper I can put on my cakes? Paper I can use my punches with? Yes, please. I took a class on
Craftsy to help get familiar with it and then just played around with different things to see how it worked.
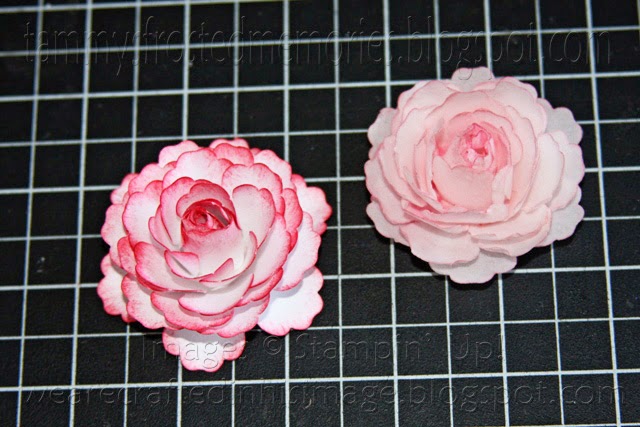
Last night I got out one of my favorite punches and made a cardstock flower and then this morning I used similar techniques with wafer paper to make the same flower. What do you think? The flower on the left is card stock, the one on the right is wafer paper. And guess what? I took pictures making both of them so I could share with you how to make them. If you'd like to make the wafer paper flower, check out my cake blog for the
tutorial.
So, let's get started.
Start by punching 6 flowers with the
Stampin' Up! Blossom punch. Then use
Paper Snips to cut in a little ways between each petal. In this photo I've only cut 4 of the 6 so you could see how far in to go.
This next step is optional and can actually be done before the petals are snipped. I used a
sponge and some
Primrose Petal ink to add some color to the edges of the petals. You'll want to do this to both sides of your flowers.
Next, take something rather narrow, I used a thin paintbrush and roll the petals of two of your flowers.
Do the rest of the flowers the same way, but with something a bit fatter. I just used a paintbrush with a wider handle.
You should have two flowers with tightly rolled petals, and 4 that are not so tight. (Pretend there's another flower in this photo. ;o)
Take one of your tightly rolled petals and
glue the sides together. It might help to wrap it around your paintbrush handle for this step.
Now bring up the opposite petal and glue it to the first one. I just glued the edges, and I may have gotten it a bit tighter than it needed to be.
Bring up two more petals that are opposite of each other. Apply glue to the edges of one of the petals and glue them to the other petal.
Do the same with the remaining two petals, but you may need to put glue on both petals as they may not be able to stretch to each other and may need to be glued to the previous petals. (Does that make sense?) This is the center of the flower.
Guess what? That was the hardest part of this flower. Now you just glue the center of each of the remaining flowers to the center of another, staggering the petals as you stack and make sure the other tightly rolled flower is on top. Sorry I didn't get a photo of this stacked flowers, but if you're confused, check out my
wafer paper tutorial where I did remember to take a picture of this step. Glue your finished center in the middle and take all the petals and pull them up and give the whole flower a gentle squeeze to help the petals stand up.
This is how it looks when you let go. Just gently pull down some of the petals to open the flower up a bit.
And, voila! (There's another one of those words that needs a doohicky on top.) You have a beautiful 3D flower embellishment. I think I may glue this one onto a magnet or clothespin.
As much as I'd love to sit in my craft room and play with paper some more, I have 3 cakes that need to be worked on, so I will close for now. Hope you enjoyed the tutorial.
Till next time...
God's love and blessings!


No comments:
Post a Comment