Bonus, this bag uses exactly one half sheet of cardstock (8 1/2 x 5 1/2), so you can get 2 bags from one sheet with minimal waste.
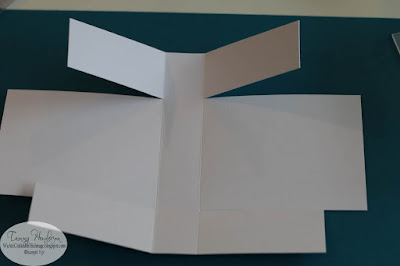
On the long side, score at 3 3/4 and 4 3/4
On the short side, score at 1 1/4 and 4 1/4
Cut along the long score lines, stopping at the short score lines. Then chop off an inch or so from the flaps you just made.
If you want to emboss your bag, this is the time to do it. Most embossing folders won't be large enough to do the whole bag in one shot, so this is a way around that. First, line the embossing folder up in this corner.
Then flip it around and line it up in this corner.
The bottom of the bag will be double embossed, but that's OK.
Then simply fold on the score lines and glue the flaps together.
You can opt to glue the front and back flaps to the inside ones if you want, or just leave them loose. I glued mine.
I filled mine with a little of our Ready Shreddie and some Robin Eggs. I think this would also be the good size for some Girhardelli Squares which would be the perfect treat to keep on hand for those times when a friend needs a little pick-me-up.
To finish off the bag, I added a strip of Designer Series Paper and I used our Fine Tip Glue Pen to adhere a strip of the Black Mini Sequin Trip to the bottom of it. I inked the flower stamp with Stampin' Write Markers and punched it and the black cardstock out with simple circles. I stamped the sentiment and then cut the words out with Paper Snips. Then, I simply closed the bag with a gold Library Clip.
I hope you like my little project. Remember, you can get all the supplies for this project and LOTS more in the April Suite Samplings Kit. See this post for more details.
Hostess Code Bonus: Please use this month's Hostess Code when you place an order. It will allow me to pick up some goodies to share with you when I send out your Thank You gift at the end of the month. (If you check the "Do No Contact" button when you order, I cannot legally contact you in any way, which means I cannot send you a Thank You gift or any extra goodies. :o( )


No comments:
Post a Comment